• Skip to primary navigation
  • Skip to main content
  • Skip to primary sidebar
  • Skip to footer

Showcasing My Scrumptious Culinary Delights

  • Home
  • Scrumptiousness Ahead
    • Scrumptious Sweets
    • Scrumptious Eats
  • Frankly Me
    • The Baker & Chef
    • Road to Culinary Greatness
You are here: Home / Archives for bakerchef

bakerchef

Chile and Garlic Shrimp

August 19, 2020

August 19, 2020–When I saw the picture for the chile and garlic shrimp in my Aug/Sept 2020 issue of Cooks Country I immediately knew they would be on my plate, and more importantly; in my stomach, in the not too distant future! The Chef, Morgan Bolling, made a bold statement at the beginning of there article, “Quick-cooking shrimp and ultraflavorful dried chiles team up to kick the midweek dinner blues to the curb.” I can tell you that she was not incorrect in her assessment. The ingredient list is pretty short and with the exception of the chiles you should have everything in your pantry and your garden.

First you make the sauce which is comprised of gauajillo chiles, water, Worcestershire sauce, and garlic cloves.

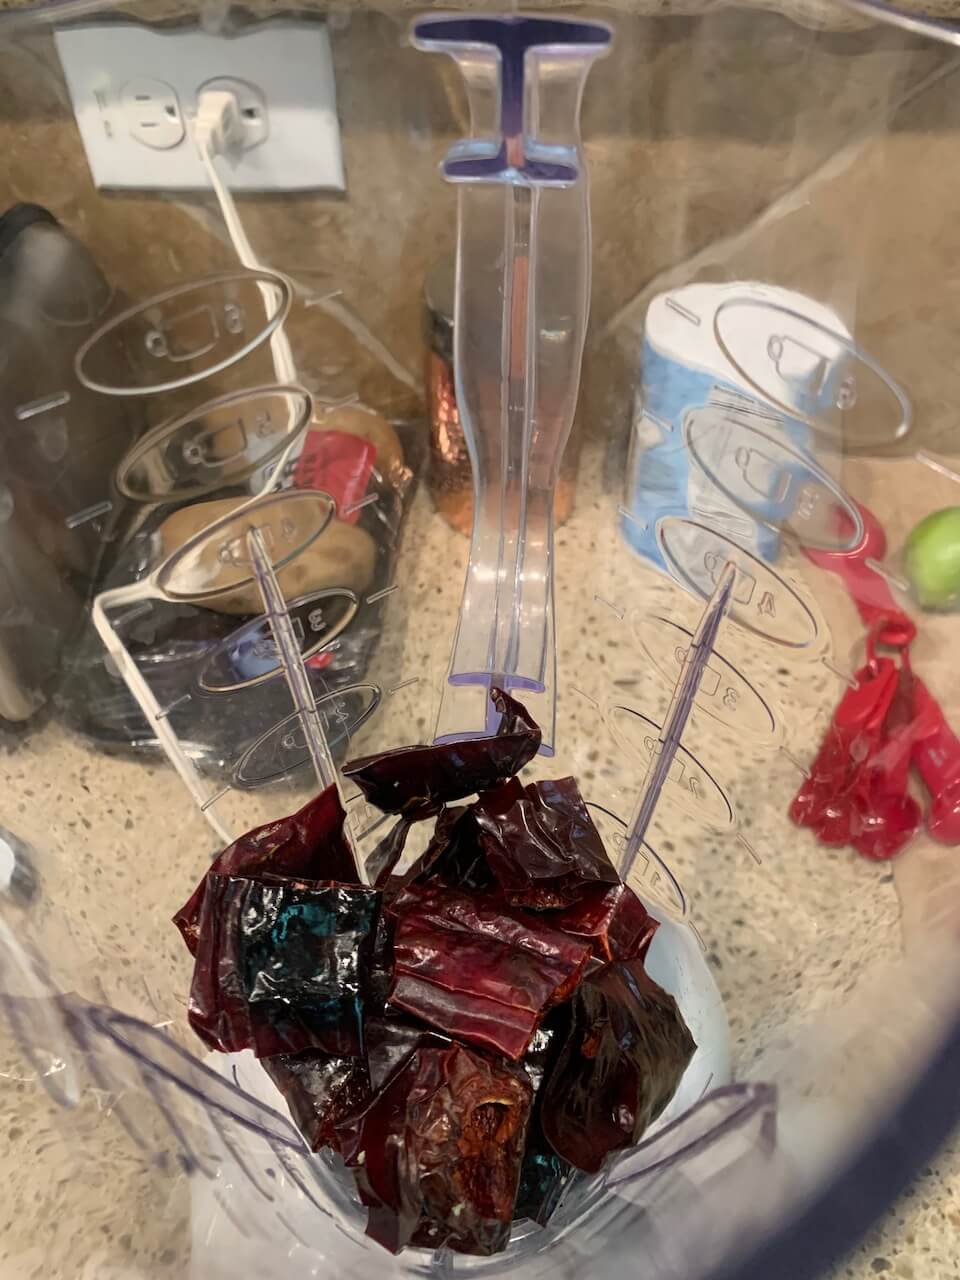
After deseeding the peppers you cut them into about 1-inch pieces and cook over medium heat until fragrant.

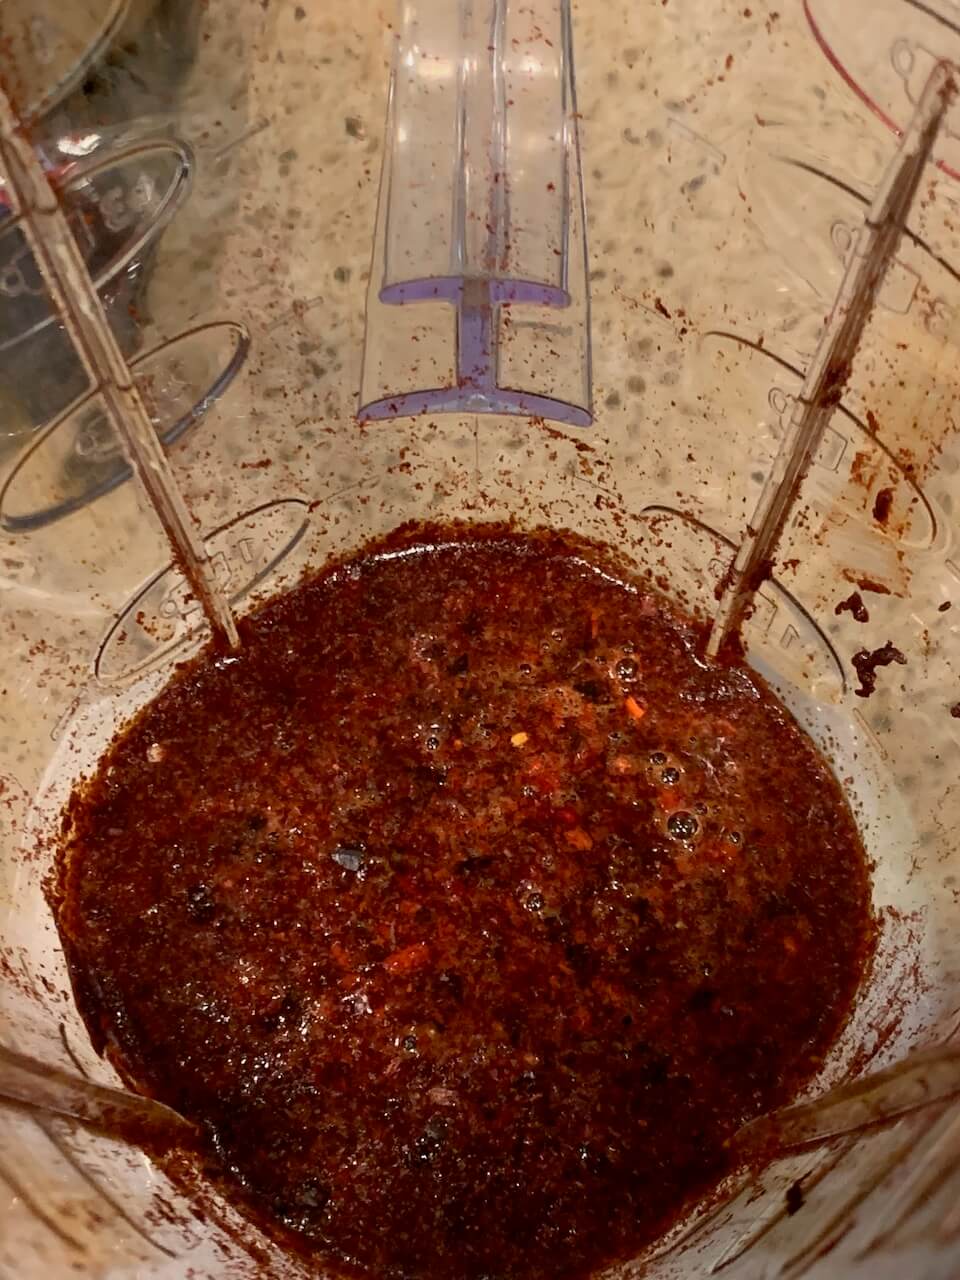
Once the chiles are fragrant you transfer them to a blender until finely ground. Be careful when you remove the lid because there will be fine chili powder in the air. Next add the water, Worcestershire, garlic, and salt. You blend this until smooth then set aside.

Now it is time to prepare the shrimp. You need about 2 pounds of the 21-25 per pound extra large shrimp that have been peeled, deveined, and tails removed. I always save my tails for use in seafood stock for my seafood bisques. Pat the shrimp dry, set aside, mix your seasonings, then sprinkle both sides of the shrimp.

Heat some olive oil over medium high heat in a 12-inch skillet. Once the skillet is just smoking cook half of the shrimp until the underside is brown but the top is still raw. Move to a bowl and cook the remaining shrimp.

Sauce some sliced garlic in the now empty pan until fragrant. Add the reserved sauce and shrimp. Cook until done.

Once shrimp is cooked, remove from heat and add lime juice and butter.

Chef Bolling recommends you sprinkle on some fresh cilantro and enjoy over rice or with warm tortillas. I tried them both ways; they were good but for my taste I would definitely add more spice or hotter chilies. These are a good second to the Shrimp Mozambique I made a while back which just happens to also be another Cooks Country creation.

Filed Under: Scrumptious Eats

Blueberry-Ginger Buttermilk Muffins

August 1, 2020

August 1, 2020–So as some of you know one of my plans after I complete the CIA, food not spies, is to visit friends and pay for my stay via food. Well, one of my friends, YMDT, took me up on it although I haven’t graduated from the CIA. Frequent visitors will realize that the countertops are different. The recipe comes from the July 2020 issue of EW magazine and is compliments of Jimmy Wong. After the dry ingredients of AP flour, baking powder, kosher salt (omitted since I had salted butter), and ground ginger after sifted together, you stir in the blueberries.

Next comes the wet ingredients of buttermilk, eggs, grated fresh ginger and lemon zest, vanilla extract, and melted butter.

After mixing the wet ingredients together you use a spatula to gently fold the dry into the wet. Instead of using muffin cups I scooped the batter into a greased mini-loaf pan and baked in a 375 degree oven for about 30 mins.

These muffins definitely have potential. I didn’t have a microplane so wasn’t able to get as much zest and grated ginger as I needed. I also think the flour and ground ginger may have been old. The end result turned out more like Blueberry-Ginger Buttermilk BREAD vice MUFFINS. Since the Chef said these were supposed to be a replacement for Banana Bread maybe the consistence was correct but I’ll hold my final review until I have the proper tools. That being said, YMDT loves them and at the end of the day that’s really all that matters.

Filed Under: Scrumptious Sweets

COVID Dram Red Velvet Cake

May 21, 2020

May 9, 2020–The Dram Classic was an awesome event. During breakfast on the last day we all agreed to do Dram II. The weekend of May 9th was the agreed upon weekend. Little did we know that COVID would hit. It was touch and go for a while but we got the invitee list down to 10, maintained Social Distancing, and renamed the event to COVID Dram. I, of course, was asked to bring a dessert. The winning recommendation was a Red Velvet Cake. Using a combination of AB’s recipe and numerous others on the internet I went to work. The MEP included: all-purpose flour, cake flour, cocoa, baking soda, kosher salt, espresso powder; dark brown sugar, unsalted butter; low-fat buttermilk, red liquid food coloring, white vinegar, and vanilla extract.

While the oven was heating to 325 degrees, I prepared two square baking pan with cooking spray and parchment paper. Mixed the dry ingredients then the butter/brown sugar until it is light in color followed by some eggs.

Add the flour mixture in thirds alternating with the buttermilk mixture.

Divide the batter evenly between the prepared pans, bake until the cake springs back when pressed or reaches an internal temperature of 205 degrees. Cool in the pans then on a rack until completely cooled before frosting.

The frosting is your basic cream cheese frosting made with cream cheese, butter, vanilla, salt, and, powdered sugar. Refrigerate for about 10 minutes to firm up.

Let the frosting begin.

Although the above looked amazing I knew I had to step it up for my friends attending the COVID Dram.

Filed Under: Scrumptious Sweets

Mushroom Arancini

May 3, 2020

May 3, 2020–I do not remember exactly where I had my first arancini but I’m pretty sure it was somewhere in Europe. I made these once before for a housewarming in 2013. Arancini are a cheese-filled Sicilian snack. Traditionally you would make them from left over risotto. You use the risotto to make cheese-stuffed balls, then coat them with breadcrumbs and deep-fry them. It is a VERY laborious task but once you make them you will immediately have new friends. They are great as an appetizer or a main meal. I had some arborio rice that I was trying to get rid of so I decided to make a batch. This is A LOT of work so before you undertake this task make sure you have the time and patients. First thing first, let’s make some risotto. You can find numerous recipes on the inter-web. I’m unsure where I got this one from but it required the items below.

Traditionally you would warm up your broth while prepping the rice. In one of the recipes I saw they added a bay leaf, I decided to also add the steams from the mushrooms.

While they were simmering I sautéed the mushrooms followed by the garlic and shallots, then the rice until it turned translucent.

Next I added the vermouth until it was absorbed. Normally you would add about 1/2 cup of the chicken stock and stir it until it was absorb. The inter-web had a no stir version where you add all of the stock, reduce to low, and simmer until it is absorbed.

Once the rice was the right consistency I stared in the chopped mushrooms then three different types of cheese until it was creamy.

I had some green onions that I had lying around so I decided to add those for a pop of color.

If you wanted you could just end here and enjoy a big bowl of mushroom risotto. From start to finish, I’ve invested about 2 1/2 hours which includes the time to take pictures.

The next part goes a bit faster especially if you have some help. The risotto needs to cool for a minimum of one hour. I used a procedure from Serious Eats. Set up your mise en place of chopped mozzarella cheese, Italian breadcrumbs, and a flour/water slurry.

The process is straight forward. I used a cookie scoop to dose out equal sized balls. Once the balls were formed I filled them with a piece of cheese, rolled them in the flour/water slurry, then the breadcrumbs.

At this point you can freeze the balls or fry them up until golden brown.

Once cooled, enjoy with some fresh basil and your favorite homemade or store bought Mariana sauce or pesto.

Filed Under: Scrumptious Eats

Depression Era Cake

May 3, 2020

May 3, 2020–Depression Era Cake is a type of cake that was commonly made during the Great Depression because the ingredients included little or no milk, sugar, butter or eggs since they were either expensive or hard to find. Although we are not in a Great Depression, COVID-19 has resulted in a lot of people cooking making normal ingredients almost non-existent. I still don’t understand the run on toilet paper but that’s for another discussion. The trick of the “depression cake” is that it substitutes cheaper ingredients for the more expensive, harder to find ones. Chef Michael Zebrowski of the CIA (food not spies) explains that vegetable oil replaces butter, vinegar and baking soda replace the eggs, etc. Although I had plenty of the usual baking ingredients I decided to give this a try. During C-19 there were numerous websites listing the required ingredients: AP flour, sugar, unsweetened cocoa powder, baking soda, apple cider vinegar, vanilla extract, vegetable oil, and cooled brewed coffee.

First you preheat your oven to 375°F and grease an 8-inch round or square pan. Whenever I make something with chocolate I dust the pan with cocoa instead of flour.

Mix the flour, sugar, cocoa, baking soda, and salt in a bowl. Poke three holes into the mix.  Mix the vanilla, vinegar, and oil then pour into each hole–don’t ask me why?!?!?!

Add the coffee and stir the ingredients until well blended.

Add to the pan. Bake for 35 minutes, or until the top is set but springy. Cool the cake in the pan.

I topped it with a chocolate ganache; you can also enjoy it plain.

Although it looked tasty I decided to take it up another level by adding a simple white chocolate ganache.

It turned into my version of a Hostess Cupcake.

Filed Under: Scrumptious Sweets

AB’s Peanut & Almond Butter Bourbon Fudge Bars

April 26, 2020

April 26, 2020–It seems like if I’m not getting a dessert recipe from my ATK cookbook, I’m getting it from an episode of Good Eats. When I saw this one I thought, “What could be easier?!?!” If you like fudge but don’t like the ‘work’ of making fudge then this is your recipe. This particular recipe allowed me to use up some of my peanut and almond butter and COSTCO bag of powdered sugar.

First you line and butter an 8×8 baking sheet with parchment paper. Next, combine the butter and peanut/almond butter in a large microwave-safe bowl and cover with plastic wrap. Microwave for 2 minutes on high, remove from microwave and stir until smooth. Return to microwave and cook on high for 2 additional minutes. Remove from microwave.

Add the vanilla and powdered sugar to the mixture and quickly stir to combine with a wooden spoon. As the mixture starts to lose its sheen and becomes hard to stir, add half of the chocolate chips, then spread in the prepared pan.

To differentiate between the two butters I added white chocolate chips to the the one that contained almond butter.

Refrigerate until completely cool.

Since they were a little plain I decided to do my best Jackson Pollock with a bourbon ganache.

Cut into bite size pieces and store in an airtight container at room temperature for up to a week; if they will last that long!

Filed Under: Scrumptious Sweets

Double Tree Chocolate Chip Cookies–Plus

April 18, 2020

April 18, 2020–“DoubleTree reveals official chocolate chip cookie recipe.”  THEY DID WHAT!?!?!?! Of course, I had to make these and include them as part of my Sunday dessert delivery! You should have all of the ingredients: butter, granulated and light brown sugar, eggs, vanilla extract, freshly squeezed lemon juice, flour, rolled oats, baking soda, salt, cinnamon, semi-sweet chips chocolate chips, and chopped walnuts.

After you preheat oven to 300°F, cream butter and sugars in the bowl of a stand mixer. Add eggs, vanilla, and lemon juice. Blend until light and fluffy. Blend in flour, oats, baking soda, salt, and cinnamon.

Remove bowl from mixer and stir in chocolate chips and walnuts.

Portion about 3 tablespoons of dough with a scoop onto a baking sheet lined with parchment paper about 2 inches apart. Bake for 20 to 23 minutes, or until edges are golden brown and center is still soft.

This was so easy, and I had the chocolate, I also made a batch where I replaced the walnuts with bittersweet, milk, white, and semi-sweet chocolate chips.

Filed Under: Scrumptious Sweets

Lime Bars

April 11, 2020

April 11, 2020–No, I do not own stock in America’s Test Kitchen (ATK). They just have great recipes so I’m always using them. I bought some limes from COSTCO in order to make gin/vodka gimlets. Unfortunately, depending on how you look at it, I had a lot of limes. Before they went bad I decided to zest and juice all of them. The zest went into a bottle and I froze the zest. Now what to do with this large volume of product? Looking through my many cookbooks, but mainly ATK, I found this quick and easy recipe. I had everything but the animal crackers. I thought about just using graham crackers but when ATK makes a recommendation there is science behind it so off to the store I went. You’re basically making a crust using animal crackers, brown sugar, butter, and salt to support the lime filling. Bake the cost at 325 degrees for 15-18 minutes until it is golden brown.

While the crust is baking and cooling you make the filling. In a bowl, stir cream cheese, lime zest, and salt with rubber spatula until thoroughly combined. Add sweetened condensed milk and whisk vigorously until no lumps remain; whisk in eggs. Add lime juice and whisk until incorporated.

Pour filling into the cooled crust.

Bake for 15-20 minutes. Cool on wire rack for 1 to 1 1/2 hours. Cover with foil and refrigerate until thoroughly chilled, at least 2 hours. Loosen edges with paring knife and lift bar from baking pan using foil extensions; cut bars 

They’re small so I’ll have one plate, please.

Filed Under: Scrumptious Sweets

Coffee Cake with Pecan-Cinnamon Streusel

April 9, 2020

April 9, 2020–As a result of daily telework I’ve been catching up on my America’s Test Kitchen recordings. Since I’m eating actual breakfast more often I’ve been making blueberry lemon pancakes or waffles, buttermilk biscuits, etc. After viewing this episode from Season 19, I knew this would be a great addition and variety to my mornings. As with all of their recipes they have a “Why This Recipe Works” section. They use a food processor for mixing the cake and the streusel topping.  To ensure the cake remained tender despite the use of the food processor’s blades, they used the reverse-creaming method.  This allowed for the flour’s proteins to be coated with fat and prevented them from linking up and forming gluten when water was added to the batter.  Having a thick batter kept it from rising over and covering the streusel and baking it in a springform pan allowed for a fuss-free unmolding that kept the streusel intact. I know it may sound like you’re using a lot of tools and maybe you are but I have them and never use them so this was right up my alley.

You should have all of these ingredients in your pantry: pecans, brown and white sugar, flour, cinnamon, salt, butter, baking powder and soda, salt, eggs, vanilla extract, and milk. Let’s make the streusel first.

While the oven is heating to 350 degrees, process the pecans and brown sugar in your food processor. Then process the flour, cinnamon, and table salt in the pecan/sugar mixture.  Add the melted butter and about a teaspoon of water. Continue to pulse until mixture clumps like wet sand.  Remove to a bowl.

Now, let’s make the cake.

Pulse the flour, sugar, cinnamon, baking powder and soda, and salt the food processor. Add the butter and pulse until butter is mixed in.  Add the milk, eggs, and vanilla.  Pulse, scraping down bowl until it comes together.

Pour batter into a greased and floured 9-inch springform pan and smooth out the top.

Add streusel from the outside to the center.  Do not press into the batter.

Bake, on a sheet tray, for 45-55 minutes. Allow to cool on a wire rack for 15-minutes.  Remove springform and allow to cool for at least 2-hours. Remove from pan with an offset spatula.

Remove a slice and enjoy!

Filed Under: Scrumptious Sweets

General Tsao’s Cauliflower

March 27, 2020

March 27, 2020–I saw this recipe for General Tsao’s Cauliflower in the Winter & Spring 2020 issue of Ingrain Magazine. I have no idea how this magazine arrived in my house but it was a welcomed addition to the many cooking magazines I already receive. In my continuing effort to eat ‘healthiest’ I decided to try these out. With the exception of the cauliflower, I had most of the ingredients on hand. I did have the hoisin or the sweet soy sauce so I improvised.

As the article states, they used cauliflower as a substitute for chicken to provide a modern day twist on General Tsao Chicken. They also provided a dipping sauce that is “loaded with all of those loud umami flavors that made the dish a classic” and can be used on numerous other food items.

After breaking down the cauliflower head into florets I combined the flour, garlic powder, kosher salt, and pepper in a medium bowl.

Since the sauce can be refrigerated for up to five days I decided to make it before frying the florets. After dissolving the cornstarch and water to a pan, I added the remaining ingredients for the sauce. As I mentioned I didn’t have sweet soy sauce so I used equal parts brown sugar and regular soy sauce as recommended by the recipe. In place of the hoisin, I used gochujang and tahini pastes and garlic

Now that the sauce is ready, it is time to mix up the batter with some water until it looks like pancake batter.

Set up your batter station and fry up your cauliflower.

I had some sugar snap peas so I fried up some of those also. As you can tell by the pictures, if you didn’t know this was cauliflower, you would think it was chicken especially with the sauce. I will definitely make this again.

Filed Under: Scrumptious Eats

  • Page 1
  • Page 2
  • Page 3
  • Interim pages omitted …
  • Page 13
  • Go to Next Page »

Primary Sidebar

Recent Posts

  • Chile and Garlic Shrimp
  • Blueberry-Ginger Buttermilk Muffins
  • COVID Dram Red Velvet Cake
  • Mushroom Arancini

Frankly Me

Hi I’m Frank. I created this blog to showcase photos of the SCRUMPTIOUS culinary delights I prepare during my free time and some of the exciting events I attend.

Some of my other interests include: Traveling, drinking Bourbon, and riding my road bike.
More Frankly →

Join the Scrumptious Mailing List

Subscribe to FranklyScrumptious

* indicates required field


View previous campaigns.


Footer

Instagram did not return a 200.

About your designer

  • Facebook
  • Instagram
  • Snapchat
  • Twitter

A Chef cooks for himself but really enjoys cooking for others. Scrumptiousness ahead →

My Favorites

Copyright © 2025 · Foodie Pro On Genesis Framework · WordPress · Log in